RonBryze.Com

An Informational and Educational Website for Professional Wood Finishers


Menu

Home
 
Finishing Classes
Finishing Videos
 
Finishing Information
Sanding
Stain Systems
Waterborne
Special Effects
Spray Application
Safety
Business Aspects
 
Gallery
 
About Us
Contact
 

POWDER GLAZES

SPRAY ON – SCRUB OFF GLAZE & TONER


Powder type glazes are a very unique product; they are part toner and part glaze. What makes it so unique is that you apply it like a toner and then selectively remove it to highlight moldings or other details. Powder type glazes can also be used for certain glazing techniques, but with much quicker dry times, and greatly reduced labor.


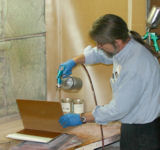
Powder type glazes are sprayed on wet and then quickly turns into a powder. They can be dry enough to work with in as little as 1 minute dry time and does not need to be sandwiched between two coats of vinyl sealer. Once the glaze is sprayed on the areas where you want it and it has dried the appropriate amount of time, the excess is removed with a ScotchBrite pad.


The solvents in powder type glazes are very aggressive. They try to bite into the layer of finish below so they typically work best over post-catalyzed finishes or high quality precats that has 
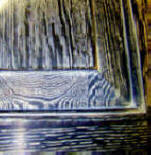
cured for over 12 hours. The longer you let any of the sealer coats dry, the less the glaze will etch into it, and the easier it will be to remove the glaze from the surface. This is important when you do techniques like the Ceruse Effect detailed below.


When powder type glazes are applied in very light coats, it almost immediately turns to dust and can literally be wiped off with your finger. This technique works well for shading and toning.


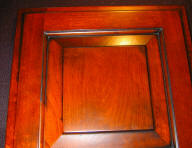
If you spray the glaze slightly wetter and let it sit a little longer, you will notice that the glaze slightly marks the texture of the woods like maple; this gives it a less painted look than regular toners.


The wetter the application, the more aggressively the glaze bites into the finish. If the glaze is applied heavy, its color may be difficult to remove completely. The longer you let the glaze sit before rubbing deeper the color will etch into the sealer coat. Dark glazes on light painted finishes can be difficult. Powder type glazes work best on painted surfaces when there is a coat of clear over the paint. While this type of product may not be for every glazing situation, when used appropriately it will give you good results and save you considerable time.


Make samples using different application rates and dry times to find the right combination for your project.


Cerused Effect using powder type glaze


The Cerused effect will work on any open pore wood, however, the larger the pore, the more dramatic the effect. If you wire brush the wood before you sand, it will help open up the grain to accept more of the glaze.


If you look at a close-up of the wood before the glaze is rubbed, you will see that the glaze has not totally filled in the pores of the wood; the surface tension that forms around the pore while the glaze is in the liquid state prevents the glaze from completely flowing into the pore and filling it up. Rubbing the wood with the ScotchBrite actually helps pack more of the glaze into the grain.


This is important for two reasons:

  • The sealer should be very dry to minimize the amount that the glaze will bite into the surface. We want the surface color clear and the pore opaque.

  • The glaze will have to go on wet enough, and wiped at the appropriate time so that it sticks in the grain. The trick is to find the application rate that lets the glaze stick in the grain, but does not require excessive rubbing to remove it from the surface. Try different application rates and dry times to see what works the best for your particular application. Always make a sample.


To get maximum clarity between the grain, do not sand the sealer before you apply the glaze. Sanding after the glaze has been worked into the grain will help remove any color that has etched onto the surface.


Basic Procedure


  • Wire brush door, be sure to follow the grain.

  • Sand the wood with up to 150 grit paper.

  • Dye wood with black dye, reduced 1 part dye to 3 parts lacquer thinner. You can use any type of stain or color. I chose a dye because of its quick recoat window.

  • Dry for about 5 minutes.

  • Spray on a full wet coat of a gloss conversion varnish. Gloss gives the best results since it is the hardest clearest finish. You can use other sheens with satisfactory results. You may also add up to 5 oz’s of the black dye per gallon of your sealer coat to help darken the background color.

  • Let sealer coat dry several hours; overnight is best.

  • Spray on a light wets coat of the glaze, tinted off white.

  • Let glaze dry about 5 minutes and then remove excess from the surface using a maroon ScotchBrite. Work the glaze across the grain to help pack it in the pore.

  • Scuff sand the door with a 320 gray paper. Follow the grain direction.

  • Inspect the door under a good light to make sure it is as clean as you want. Color left on the surface will make the black look milky.

  • Lightly blow off dust. Hold blow gun at a low angle and blow across the grain so you don’t blow the powdery glaze back out of the pore. You can follow this with by a wipe with a good tack cloth.

  • Spray on a very light mist coat of a satin conversion varnish and let dry about 15 to 20 seconds. This locks the powder in the pores so again it doesn’t get blown out.

  • Apply a full wet coat of finish.


This same basic procedure can be used to apply a white glaze to a light or natural oak for a pickled effect. The lighter colors are very easy to do, since a little color left on the surface is not as noticeable and can actually enhance the look.


By Ron Bryze at RonBryze.com


Home